The Recurring Invoices feature in our ERP system is designed to simplify the management of regular billing cycles, helping businesses that need to issue invoices on a recurring basis. Whether you are billing customers monthly, quarterly, or annually, this feature ensures that invoices are generated automatically, saving time and ensuring consistency in your billing process.
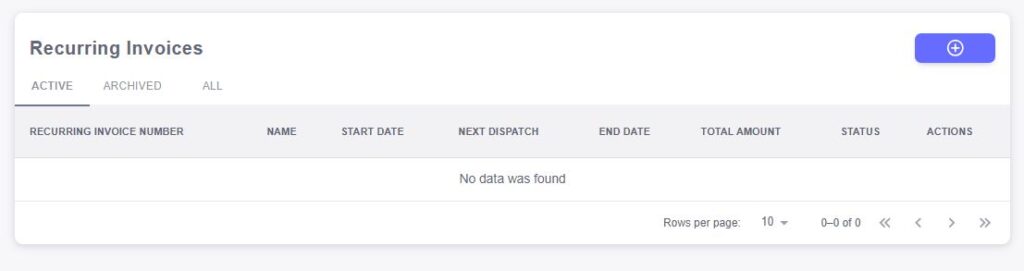
Recurring Invoice Number
Each recurring invoice is assigned a unique Recurring Invoice Number, which allows for easy tracking and reference. This number helps ensure that all recurring invoices are properly documented and can be retrieved when needed.Name
The Name field indicates the customer or client associated with the recurring invoice. This helps you quickly identify which customer will be receiving the recurring invoice and ensures that the billing is linked to the right customer profile.Start Date
The Start Date marks the beginning of the recurring billing cycle. This is the date when the first invoice is issued and sets the foundation for subsequent invoices. The system uses the start date to determine the frequency and intervals of billing.Next Dispatch
The Next Dispatch field indicates the date when the next recurring invoice will be generated. This is calculated based on the frequency you set for the recurring invoice (e.g., monthly, quarterly). The system will automatically update this date for each new cycle, ensuring invoices are generated on time.End Date
The End Date is used to specify when the recurring billing cycle will stop. This is useful for time-limited services or agreements with a set duration. After the end date, the recurring invoice cycle will automatically be canceled, preventing any further invoices from being issued.Total Amount
The Total Amount field reflects the amount that will be invoiced on each recurring cycle. This could be a fixed amount or one that fluctuates depending on the services or products being billed. The total amount is used to calculate the recurring charges for each billing period.Status
The Status field helps track the current state of the recurring invoice. Common statuses include:- Active: The recurring invoice is active, and future invoices will continue to be generated as scheduled.
- Paused: The recurring invoice has been temporarily paused and will not be generated until resumed.
- Completed: The recurring invoice cycle has ended, either because the service or agreement has concluded or the end date has been reached.
- Cancelled: The recurring invoice has been canceled, and no further invoices will be generated.
Actions
The Actions section provides options to manage each recurring invoice. Common actions may include:- Edit: Modify the details of the recurring invoice, such as the billing cycle or total amount.
- Pause: Temporarily stop the recurring invoice from being generated.
- Cancel: End the recurring billing cycle before the scheduled end date.
- View: Access the full history of invoices associated with the recurring billing cycle.
The New Recurring Invoice feature in our ERP system simplifies the process of setting up and managing ongoing billing cycles. Whether your business offers subscription-based services, maintenance contracts, or regular product deliveries, this feature allows you to automatically generate invoices at set intervals, ensuring that you never miss a billing cycle.
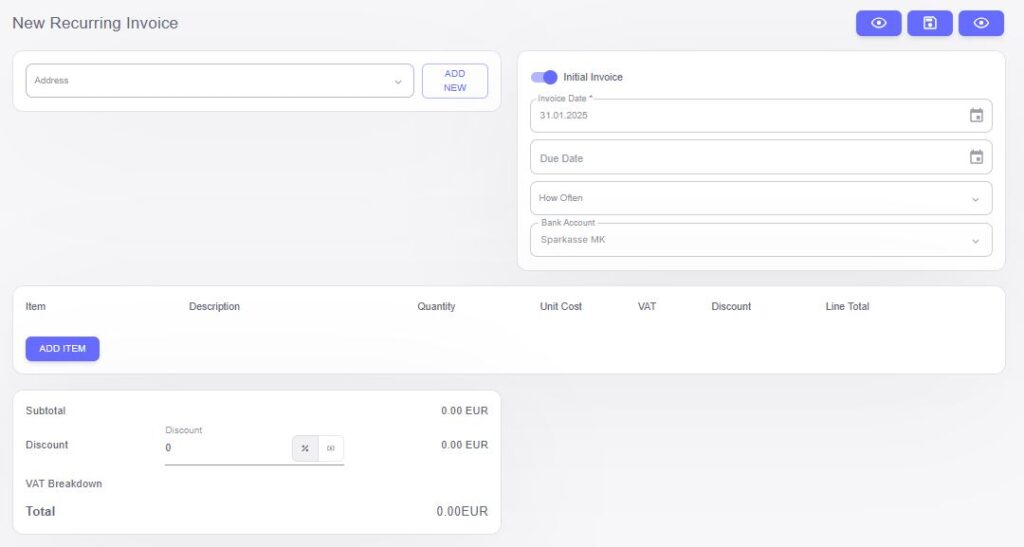
Steps to Create a New Recurring Invoice:
Select Customer Address
Start by selecting the appropriate Customer Address for the recurring invoice. You can choose from a list of saved addresses (billing or shipping), ensuring the invoice is linked to the correct location and ensuring timely delivery.Set Initial Invoice Details
- Due Date: Set the Due Date for the initial invoice. This represents the date the first invoice will be due for payment. The system will calculate subsequent due dates based on the frequency you specify.
- Frequency: Specify how often the recurring invoice will be issued (e.g., monthly, quarterly, annually). This will define the intervals for future invoices, ensuring that your billing cycle is consistent.
- Next Invoice: The system will automatically calculate the Next Dispatch date based on your frequency settings, ensuring that each new invoice is generated on time without the need for manual intervention.
- End Date: Set an End Date if there is a predetermined duration for the service or agreement. After this date, the recurring invoices will automatically stop.
- Due Date: Set the Due Date for the initial invoice. This represents the date the first invoice will be due for payment. The system will calculate subsequent due dates based on the frequency you specify.
Add Items to the Recurring Invoice
Next, you can add the specific items that will appear on each recurring invoice. For each item, enter the following details:- Item: Choose the product or service being billed from your inventory or service catalog.
- Description: Enter a brief Description of the item, giving your customer a clear understanding of what they are being billed for.
- Quantity: Specify the number of units being billed for each item. For example, if you’re billing for a monthly service, the quantity could be 1 for each period.
- Unit Cost: Enter the Unit Cost of each item. This is the cost per unit for the product or service. The system will use this cost to calculate the total for each billing cycle.
- VAT: Set the VAT (Value Added Tax) rate applicable to the item. The system will automatically calculate the VAT for each item based on the unit cost and VAT rate.
- Discount: If a discount applies, enter the Discount percentage or amount. The system will automatically adjust the Line Total to reflect the discount applied to the item.
- Line Total: The Line Total is automatically calculated based on the quantity, unit cost, VAT, and any discount applied. It represents the total cost for the item in each billing cycle.
- Item: Choose the product or service being billed from your inventory or service catalog.
Review and Finalize the Recurring Invoice
Once you’ve added all the items to the recurring invoice, the system will display the Total Amount, which includes the sum of all the line totals, taxes, and any discounts. You can review the entire invoice to ensure that all details are accurate, including the customer address, itemized products, and payment terms.Activate the Recurring Invoice
After verifying the details, you can activate the recurring invoice. Once activated, the system will automatically generate invoices according to the frequency and due dates you’ve set, ensuring that your customers are billed on time without any manual effort.